Photo-taking Tips From An Amateur
- My camera and my phone both take more picture than what shows up in the frame so I fill the entire frame with my subject. Later, I crop out what I don't want.
- Try to keep the camera level. Then taking pictures of quilts or blocks, line up the bottom of your frame with the bottom of the quilt or block. Always look at the picture to check for straightness. If it is way off, take another one.
- Sometimes my pictures are out of focus and the lighting is off. I think this has to do with the automatic settings I have. I just take another picture and eventually I get a good one.
- Lighting is one of the most important things to think about. If you don't have good sunlight, turn on all the lamps in the room.
- I like to take several shots of the entire quilt, then several close up shots of the fabrics, blocks, quilting, label, whatever you want to remember.
- When you are editing a picture, always keep the original by using File > Save As... You might want to use that picture in a different way later.
- Beware of the vanishing quilt. If your quilt is hanging at an angle where the top of the quilt is against the wall and the bottom is away from the wall, the picture will show the quilt narrower at the top and wider at the bottom. Same thing happens if you put the quilt on the floor and you take the picture while standing on the floor facing the quilt. Try to keep the camera parallel to the quilt.
Cropping takes out the extra stuff you don't want in the picture such as Fred the dog or your child making faces at you. Here is how you crop in Paint.NET and in most photo editing software.
- Display the tool bar by clicking Window > Tools. The first three tools in the left column are for selecting areas on the image: rectangle, lasso and ellipse. I use the rectangle which you can set to normal, fixed ratio or fixed size. Normal gives you more freedom to select but I like the fixed ratio or size because I often need a square image such as when adding items to the QuiltNotes database, a square image looks better on the computer screen. I have been adding LOTS of items to the QuiltNotes database.
- Once I'm happy with the area I selected I want to take out everything outside that area. Choose Image > Crop to Selection. If I like the results I choose File > Save As... to save this version of the photo. The original version remains unchanged.
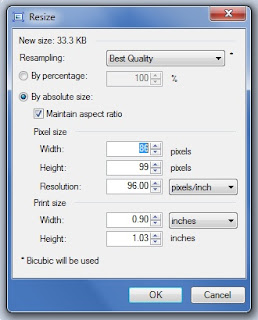
When resizing an image you want to keep the length and width proportion. If you don't, the resulting image will be stretched or squeezed in one direction or the other.

Choose Image > Resize to open the Resize screen. The option checked here is By absolute size and Maintain aspect ratio is checked. This means that if you change the width or height, the proportions will remain the same and your image will not be distorted.

The option checked here is By percentage. This option will also keep the proportions the same.
Make the changes you want then click OK.
Canvas Size
When I have an image of a rectangular quilt but I need a square image I change the canvas size.
 |
This is Pat Sloan's free quilt pattern download It's Five O'clock Somewhere.
When I added this pattern to the QuiltNotes database, I wanted a square image, otherwise this image will be distorted.
Changing the canvas size adds white space where needed to change the image how I need it.
Click Image > Canvas Size. Check By absolute size: only. Here we do not want to maintain the aspect ratio.
Look at the Width and Height numbers. Here the width is 250 and the height is 313. We want to make this image square so we take the largest number, 313 and change the smallest number to equal that. So change 250 to 313 then click OK.
This adds white space to the sides, making the rectangle into a square.
Carol Thelen


