SUBSCRIBE

Subscribe to this blog - CLICK HERE

Wednesday, March 28, 2012

Choosing Quilt Backing Fabric

Often when we are choosing fabrics for the quilt top, the last thing on our minds is what to use for the backing. And possibly farthest in our minds is how the quilt will be quilted. As a professional quilter I have asked hundreds of quiltmakers how they want a top quilted and many times the answer is "I have no idea!" I completely understand this. Many quilters, myself included, love the idea of choosing fabric, cutting it into small pieces then stitching them back together again. It is the process of making the quilt top that is the most fun. Quilting and completing a quilt is often not the final goal of many quiltmakers. Some of these quiltmakers call themselves "toppers". I completely understand.

But if you plan to have the top quilted and to actually finish the quilt then I ask you to consider the quilting designs, thread color and backing fabric as carefully as you choose fabrics for the top. Let me give you an extreme example of what I'm talking about. A new quiltmaker brought me a top that consisted of two solid fabrics: pure white and navy blue nine patch blocks. The finished blocks were 6" and the nine patch blocks alternated with solid white blocks. The quilt was a large king size. The backing was solid white.


The quilt top was very well pieced and was cherished by this quiltmaker.

One important thing to consider when choosing fabric and the quilting design is the quilting thread color. For longarm quilting and often for home machine quilting it is best to match the top and bobbin threads. Thread tension does not always stay perfect especially with free motion quilting so if you use white on the top and navy in the bobbin, you will have pokies, top threads poking to the back or bobbin threads poking to the top. This gives an unpleasant look.

The choices for quilting were allover design or custom quilting. Let's look at the allover design first. Choosing the design is no problem. I would suggest a curvy, swirly or flower design that interlocks and  is not symmetrical since there is so much symmetry in the piecing design. For thread color, I would suggest white since most of the quilt top and all of the backing are white. There will be a contrast of the white thread on the navy patches but overall the contrast is toned down with the large amount of white fabric.

For a custom design the client wanted a daisy type flower quilted in each plain white block and stitch in the ditch (SID) of the nine patch blocks. No problem with the daisy design because I used white thread which looked great on the white fabric for the top and backing but the stitch in the ditch was a different story!

The client only wanted stitch in the ditch so there was no compromise there. The problem comes when deciding which thread color to use. There are several problems:
  1. SID means just what it says, you stitch in the ditch formed when the fabrics are pressed to one side. In many cases the seam is pressed toward the dark but it isn't always the case. That means the ditch moves from the white fabric to the dark fabric and back at different times.
  2. If white thread is used to SID it will blend well when the ditch is on the white fabric but it will stick out like a sore thumb on the navy fabric.
  3. Why not just stay on one fabric whether the ditch is there or not? Because then you are alternating SID with top stitching which would really be distracting.
  4. Changing thread colors is time consuming and probably not a solution unless you have lots of time to get the quilting done.
  5. If SID is not a requirement, one solution would be to quilt a large "X" in the nine patch blocks using navy thread. That would look nice on the top but  would you like the contrast of the navy "X" on the white backing?
  6. Machine quilting, especially custom quilting, has lots of stops and starts. When using thread that contrasts with the fabric, these starts and stops are highly visible and can be distracting.


Lots of things to consider!

Here are pictures of the front and back of a scrap quilt I recently completed. I used variegated thread in the top and a coordinating thread in the bobbin.


For the backing, I pieced together 5 different fabrics. In the picture below you can clearly see the quilting in the light color fabric but it blends in with the busy print fabric.


Keep some of these things in mind when choosing fabrics for the top and backing. Have a general idea of what quilting design and thread color you might use to complete the quilting.

Happy Quilting!
Carol Thelen

Tuesday, March 27, 2012

Jelly Roll Race Quilt - Finished!

I finished my first Jelly Roll Race quilt that I first told you about Jelly Roll Race - Tips From A Winner

This was a great quilt and I know I'll do more in the future.


Happy Quilting!
Carol Thelen

Thursday, March 22, 2012

Download Free Quilt Pattern - Rail Fence

This is a great quilt pattern for beginners and experienced quilters will find this a quick way to use up scrap strips of fabric.

Rail Fence Scrap Quilt With Borders


Strips are cut 2-1/2" from the width of fabric then sewn into sets of three. For variety you can cut strips in different sizes or sew your strips into sets of 4, 5, 6 or more!

Have yardage of two or three fabrics, use just those fabrics for a not-so-scrappy look.

The pattern shows two different block settings.


For beginners, some very basic tools include a rotary cutter, a cutting mat and ruler. The perfect set I found for beginners is the Fiskars 3 Piece Quilting Set. This set includes a 45mm rotary cutter, a large 18" x 24" cutting mat and a 6" x 24" cutting ruler.
Happy Quilting!
Carol Thelen

Wednesday, March 21, 2012

Oh, I Don't Know, It's About Twin Size!

This is the answer I often got when I asked my quilting clients "How big is the top?" They wanted an estimate of my quilting charge which is determined by the size of the quilt top. Since they didn't know the measurements, I used 75" x 95" as an estimate which is my idea of a twin size. When the client showed up with the top, the actual measurements were more in the neighborhood of 88" x 102". One quilter's twin size quilt is another quilter's queen size quilt.

So just how big is a twin, full, queen, etc size quilt anyway? There is no "standard" quilt size. If you're planning a quilt to fit a particular bed, then measure that mattress and determine how much over hang you want on the sides, top and bottom.

The mattress dimensions shown below are probably good for our purposes. In order to get exact measurements measure the mattress yourself and use those measurements to make the quilt the required size.

  1. Start with your mattress dimensions. In our example we will use a full size. Add the mattress thickness for each side and for the foot of the bed. Mattress thickness can range from 4 – 22 inches so you will need to measure this yourself as well. In our example we will use a 16” thickness.
  2. Determine how much extra you want the quilt in addition to the mattress thickness. These include if you want the quilt to cover a box spring, cover side boards or reach to the floor. Add these measurements to the sides and foot of the quilt.
  3. If you want to be able to cover the pillows with the quilt or if you want to fold back the quilt at the head of the bed, add extra for that to the length measurement.
  4. Finally you’ll want to add a few inches for shrinkage due to quilting and washing. The more heavily quilted it is, the smaller the finished quilt. The batting can shrink once it is washed. In this example I used 2” for each side but this is probably a bit much and can realistically be cut in half.
 In this example I was very generous when adding to the length and width, especially for the shrinkage amounts. The final quilt size of 98" x 117" seems quite large. Be sure to give your final quilt measurement the sanity check. Drape a large tape measure across the bed to see where the actual measurements fall and adjust as needed.


Happy Quilting!
Carol Thelen

Tuesday, March 20, 2012

Easy Editing of Your Quilt Photos

I'm not a photographer so when I take pictures of my quilts I usually take 4 to 5 and hope one of them is usable. With the cameras and even smartphones we have today, the pictures are of very good quality and very large. I usually need to resize them for the computer so they don't take forever to download. I have been using Paint.NET, a free photo editing software for a few years and it is powerful yet simple and fits my needs very well. Download Paint.NET. The features I use most are crop, resize and canvas size.

Photo-taking Tips From An Amateur
  • My camera and my phone both take more picture than what shows up in the frame so I fill the entire frame with my subject. Later, I crop out what I don't want.
  • Try to keep the camera level. Then taking pictures of quilts or blocks, line up the bottom of your frame with the bottom of the quilt or block. Always look at the picture to check for straightness. If it is way off, take another one.
  • Sometimes my pictures are out of focus and the lighting is off. I think this has to do with the automatic settings I have. I just take another picture and eventually I get a good one.
  • Lighting is one of the most important things to think about. If you don't have good sunlight, turn on all the lamps in the room.
  • I like to take several shots of the entire quilt, then several close up shots of the fabrics, blocks, quilting, label, whatever you want to remember.
  • When you are editing a picture, always keep the original by using File > Save As... You might want to use that picture in a different way later.
  • Beware of the vanishing quilt. If your quilt is hanging at an angle where the top of the quilt is against the wall and the bottom is away from the wall, the picture will show the quilt narrower at the top and wider at the bottom. Same thing happens if you put the quilt on the floor and you take the picture while standing on the floor facing the quilt. Try to keep the camera parallel to the quilt.
Crop
Cropping takes out the extra stuff you don't want in the picture such as Fred the dog or your child making faces at you. Here is how you crop in Paint.NET and in most photo editing software.
  1. Display the tool bar by clicking Window > Tools. The first three tools in the left column are for selecting areas on the image: rectangle, lasso and ellipse. I use the rectangle which you can set to normal, fixed ratio or fixed size. Normal gives you more freedom to select but I like the fixed ratio or size because I often need a square image such as when adding items to the QuiltNotes database, a square image looks better on the computer screen. I have been adding LOTS of items to the QuiltNotes database.
  2. Once I'm happy with the area I selected I want to take out everything outside that area. Choose Image > Crop to Selection. If I like the results I choose File > Save As... to save this version of the photo. The original version remains unchanged.
Resize
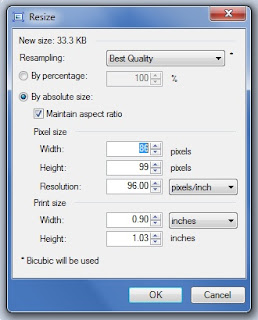
When resizing an image you want to keep the length and width proportion. If you don't, the resulting image will be stretched or squeezed in one direction or the other.


Choose Image > Resize to open the Resize screen. The option checked here is By absolute size and Maintain aspect ratio is checked. This means that if you change the width or height, the proportions will remain the same and your image will not be distorted.


The option checked here is By percentage. This option will also keep the proportions the same.


Make the changes you want then click OK.


Canvas Size
When I have an image of a rectangular quilt but I need a square image I change the canvas size.


This is Pat Sloan's free quilt pattern download  It's Five O'clock Somewhere.

When I added this pattern to the QuiltNotes database, I wanted a square image, otherwise this image will be distorted.

Changing the canvas size adds white space where needed to change the image how I need it.


Click Image > Canvas Size. Check By absolute size: only. Here we do not want to maintain the aspect ratio.

Look at the Width and Height numbers. Here the width is 250 and the height is 313. We want to make this image square so we take the largest number, 313 and change the smallest number to equal that. So change 250 to 313 then click OK.


This adds white space to the sides, making the rectangle into a square.


Happy Quilting!
Carol Thelen

Friday, March 16, 2012

Easy Quilt Block To Make From Strips

Somehow I stumbled upon two really great internet sources for techniques and free patterns. First I found a YouTube video from Missouri Star Quilt Company showing how to use jelly roll strips (or any strips) to make a quick and easy quilt block. Jenny Doan, one of the owners of Missouri Star Quilt Company in Hamilton Missouri, is the star of this and, I believe, all of the 123 videos on the channel.

The video is called Amazing Jelly Roll Quilt Pattern by 3 Dudes! There is a link below. In the video Jenny talks about the technique she uses for making pinwheels and how a similar technique is used by 3 Dudes Quilting in Phoenix Arizona.


Sew strips together in sets. The strips don't have to be the same width but it is more efficient if you use strips cut from the width of fabric.

I used three in a set but you can use as many as you like. The more strips you use, the larger your finished block will be.
Cut each strip set into squares. My strip set finished up at 6-1/2" so my squares were cut at 6-1/2". Mix up the squares. Take two squares and place one with the seams going horizontal and another on top, right sides together, with the seams going vertical.

Stitch a 1/4" seam allowance along each outside edge of the blocks. Shown here in black.

Using your rotary cutter, ruler and mat, cut the block in half twice diagonally. You will have 4 smaller blocks from each sewn set.


Here are 3 blocks after cutting. These are not from the same block set. The block set started out at 6-1/2" and when it was cut, these squares were 4-1/4".


Here are the blocks sewn together.

You have to be careful when stitching these blocks together because all the edges are bias but it does help to match up the seams.


This is the almost finished quilt. I will be adding borders today.


3 Dudes Quilting has a free quilt pattern download using this technique. The pattern was designed by Ray Steeves, one of the 3 Dudes


Happy Quilting!
Carol Thelen

Thursday, March 15, 2012

Jelly Roll Race - Tips From a Winner!

OK first I have to admit I did have a slight advantage to winning my first Jelly Roll Race.....I use a Janome 1600P-DB for piecing quilts. The 1600 stands for 1600 stitches per minute! I finished the race in under 27 minutes and the second place finisher took about 5 minutes more. Kudos to her, she even had to change a broken needle!!

What is this Jelly Roll Race, you ask! Oh my gosh it is so much fun you won't believe. You take one jelly roll or Bali Pop or whatever they call a set of 40 strips of fabric cut 2-1/2" wide x the width of fabric. Generally these sets are each from one fabric collection and each fabric company has their own name for them.  Sometimes, but not always, some of the fabrics in a collection are duplicated in the set.  

Preparing for the Race
I was at a guild retreat for my race. There is some prep work required before the race.
  1. Take all the strips from the jelly roll and stitch them together end-to-end to make one long strip of fabric that is about 1600 inches long. You have several choices to stitch the ends together. You can use a straight seam, diagonal seam or stitch squares of fabric between the strips. I chose to stitch diagonal seams.
  2. Press the seams to one side.
  3. From one end (doesn't matter which end) cut off about 18" of fabric. This prevents the seams from lining up as you stitch.
  4. Take the two ends and put them right sides together. Essentially you are folding this long strip in half. You will be stitching the two layers together down the ENTIRE length which is about 800 inches now. Don't worry if the strip gets twisted. You will take care of that as you reach the fold and the end of the first round of stitching.
Roll It Up
  1. As I matched the edges together for the first round, I wrapped the layers over a large rotary cutting ruler, starting with the open ends and ending with the fold. Pin the fold to the wrapped fabric to hold it in place.
  2. Now slide the roll off the ruler until the race is about to start.
The Race
When it is time to get ready to race you are allowed to put your fabric under your presser foot with the needle down. This next step tells you how I prepared for the first round.
  1. Remove the pin from your wrapped fabric and start unwrapping it into a pile on the floor in front of your sewing machine. The fold will be on the floor and all the rest of the fabric is unwrapped on top.
  2. End with the open ends under your presser foot.
  3. As you stitch the first round the fabric will always be coming off from the top of the pile.
Note: Several people in our group rolled the fabric onto a small cardboard or tube. This turned out to be a disaster because as the fabric was unrolled, the roll itself rolled and bounced around, making a large tangled mess.

Round One
This round took the longest time and was fairly easy. You need to concentrate on keeping the sewing edge aligned and keeping track of your 1/4" seam allowance. I moved back away from my machine and held the bottom fabric in my right hand and the top fabric in my left. I was able to match layers and align seam allowance with very little movement and hardly no stopping.

When you are nearing the fold at the end, stop stitching. The fold will probably be twisted. Use your scissors to clip the fold as close to the end as you can. I slipped one of the scissors blades into the loop to get as close as I could. Don't worry if the edge is jagged. It will be trimmed later. Finish stitching to the end.

Round Two
When you finish round one, the sewn strip will be in a pile in front of your machine. You will take the end you have in your hand (the fold you just clipped) and match it to the beginning of the strip that's at the bottom of the pile in front.

This round is the hardest to stitch because you must open the top layer and the bottom layer then match the edges to stitch. Sometime during this round I ran out of bobbin. This was the only bobbin change I needed.

When you reach the end it will probably be twisted as well so use the same method to clip the fold.

Rounds Three, Four and Five
Each of these rounds gets easier because it starts to lie flat and it's easier to match the edges. It is better if you can try to match the edges without twisting the entire thing because your edges might be very ragged. When you get to the end of each of these rounds and if it is not twisted, stitch all the way off. Lay the fold flat and use your scissors to cut the fold.

It's Finished!
After round five and after trimming, my quilt was about 48" x 65". Here is a picture:


I will put a small yellow border then a larger I-don't-know-what-color border.

Happy Quilting!
Carol Thelen

Subscribe here

Subscribe to this blog - CLICK HERE